Thursday, February 25, 2010

Craft (Day and) Night

Oh my gosh, this is not a food post! I actually had planned for tonight to be a craft night a little over a month ago. A gathering of friends just come over and make whatever it is that they are working on, or I find some kind of tutorial to go off of for a new project.

Craft night started a little bit earlier. Sarah came over to make more promotional sketchbooks, and I tried out Susie Gharemani's (aka www.boygirlparty.com) easy handmade sketchbook how to. Here is the link for that:

http://boygirlparty.livejournal.com/217584.html?mode=reply


These are the two sketchbooks that I made. They were super simple, and I just did the sewing by hand (though they could be easily run through a machine). I love the fact that Susie uses a rubber band for a closure. It keeps everything nice and flat. I also had fun playing with the stitching methods.


Later in the evening, the other crafters showed up and got to business. My friend Stephanie (http://www.etsy.com/shop/oppositedayshop) had been making these great rosettes - which I actually have been really wanting to learn how to do. I thought it would be this really complicated task, but once I got the hang of it, they were pretty easy. It's great, because you can use just about any fabric and make things like: keychains, barrettes, broaches, headbands and more. I am pumped to have been shown this technique, and I see a lot of little rosettes in my future! Here are tonight's creations:


I am really pleased with how these 3 items turned out (2 broaches and a barrette). I definitely want to make some really cute headbands with the corduroy flowers.


If you have any questions on either of the projects shown here, please feel free to ask away. I'd be happy to help. I am excited for the next couple of weeks, because my schedule is a little more open than it has been. I am hoping to bulk up my etsy store and get some new things made! :)


Tuesday, February 23, 2010

Yummy Pesto

Someday I will get back to crafting as there's only 5 more days to submit recipes for the cookbook challenge. But for now, I again bring you another homemade favorite - spinach basil pesto. I really love it's fresh garden flavor. We also make it from time to time for our vegetarian friends. It's nice, because we are always looking for meal options for them. So without any further ado, here is the recipe along with some photos:

Super Creamy Spinach Basil Pesto

3/4 bag fresh spinach
1 container fresh basil leaves (about 20 leaves from a bundle)
1/4 cup olive oil to start (more to stream in)
1 tablespoon minced garlic
1/2 tablespoon sea salt
1/2 tablespoon black pepper
zest of 1 lemon

To start, add about 50-75% of the spinach to the blender or processor.
Add the 1/4 cup of olive oil to moisten and coerce the blending.
Add the rest of the spinach plus all of the basil.
Use the pulse function of the machine to blend while steadily streaming in olive oil.
Add the salt, pepper and minced garlic.
Give these ingredients one last whiz until the desired consistency is reached.


This is what it looks like after the steps mentioned above. From this point on, I reserve the pesto and wait for my pasta to finish cooking. After draining the pasta I add about 1 tablespoon of butter to it for flavor and let it melt completely. Then, I stir in the pesto. The final touch is adding the lemon zest and stirring so that it mixes throughout.


This is what our finished meal looks like, and it was mighty tasty. You can even see the steam coming out of the bowl.


Now some of you may be wondering why I did not add nuts into my pesto. I have tried the traditional varieties with pine nuts and walnuts. I honestly just prefer the smooth, creamy texture of this pesto without them. If you try this or a similar recipe just tailor it to your liking. It is great for veggies and non-veggies alike!

Monday, February 22, 2010

Checkers and Meatballs

Hello again! It has been a very, very busy weekend around here. I cooked. I baked. I laid floors with my mom. We hosted a game night. It was a truly awesome time.

I knew that we were having Phil's parents over Saturday night for one of our family game nights. We were in charge of dinner and dessert. I also knew that earlier that morning and all through the day, I would be installing our new kitchen floor. My parents kindly purchased it for us, and my mom and I made it our project. It is just a peel and stick, but it definitely suits our retro sensibility. It's also just nice to know that it is our floor. It is clean and new, and no one else has spilled on it previously.


Everything looks better against these walls - the teal and chartreuse walls, vintage advertisements from the early and mid-century 1900's, my Elvis swingin' hips clock collection and of course the creme de la creme...vintage yellow vinyl and chrome diner chairs inherited from my dad's parents.


I think now we just have to work on getting a much cooler tablecloth!


And now for part two of this post. I had mentioned earlier that I cooked for our game night. Phil decided that we were making spaghetti and meatballs for our folks. I was just hoping that my meatballs would impress an Italian palette. Luckily, they received the seal of approval. Here is the recipe I used for them:

Italian-Style Meatballs

1 lb. lean ground beef
1/2 cup chopped white onion
1/4 cup milk
1/2 cup breadcrumbs (you can use Italian ones or just season the plain variety)
1 egg
1 tbsp minced garlic
1 tbsp Worcestershire sauce
1/2 tbsp flaked or finely chopped  parsley
1/2 tbsp flaked or finely chopped basil 
1/2 tsp salt
1/2 tsp black pepper

Preheat oven to 400˚F.
Combine all ingredients in a large mixing bowl.
Form into balls about 1" - 1 1/2" round.
This will yield about 20 good-sized meatballs.
Put them in an ungreased baking dish.
Bake at 400˚F for 20 - 25 minutes or until the juices run clear.


Pre-oven


Post oven


That is it for the meatballs. From that point on, we just add them to our sauce and let everything simmer together until the pasta is ready. Molto bene!


Thursday, February 18, 2010

Simple Chicken and Corn Chili

We are chili fanatics. I decided to try a new recipe just to mix our routine up a little bit. After referencing which ingredients to use, this is what I came up with:

1 can of pinto beans
1 can of corn kernels
1 small can of tomato sauce
1 jar of medium or mild salsa
2 boneless, skinless chicken breasts
2 tbsps of cumin
1 - 2 tbsps of chili powder
1 tbsp of minced garlic
salt and pepper (to taste)


Turn slow cooker on to the high setting. Add all of the ingredients, and cook on high for 3 to 4 hours - stirring occasionally. After the 3 to 4 hours, remove the chicken breasts to either a bowl or a cutting board. Shred all of the chicken using the 2 fork method. Return all of the shredded chicken to the slow cooker. Cook everything for an additional 30 minutes. (If you need more time just switch it to the low setting at this point). Here is what it looked like:


It was really delicious. Surprisingly, it did not taste like a jar of salsa! :) We actually had some leftover white rice from Chinese food, so we used that as a base. It was like a delicious Mexican gumbo. Please let me know if you try this recipe and like it!

Wednesday, February 17, 2010

New Listings


I have spent the past couple days adding listing new items in my etsy shop! Please check them out, and let me know what you think.

If you have any requests for items like cards or custom invitations, please don't hesitate to ask. I am happy to help!

http://www.etsy.com/shop/dessertforbreakfast


This is just one of the many available items!

Brussel Sprouts

I am not sure how many people are actually fans of Brussel sprouts, but I am definitely one of them! my mom had me try them when I was really young, and despite the fact that they were green and good for me I truly liked them. I hadn't actually had them more than a few times either before the other day. The last time I was at the grocery store they had beautiful, large sprouts so I grabbed a couple handfuls.

I wanted to impart more flavor into them and make them more of a star. Here is what I came up with:

about 20 large Brussel sprouts
chopped bacon
1 tbsp olive oil
1 tbsp butter
salt and pepper

I cut all of the stems off of my sprouts and halved the larger ones in the bunch. Then I boiled them using a skillet pan in some salted water. (I used only enough water to come to the tops of each sprout). I flipped them a few times to ensure even tenderness. I then used a slotted spoon to retrieve my sprouts and placed them in a bowl of cold water.

I drained all of the sprout water and returned the pan to the stove. Next, I put in enough olive oil to coat the bottom of my pan (about 1 tbsp). Then I added my chopped bacon. (I didn't measure it...just used enough to have some bits with every bite). Once it was nice and crispy, I added the sprouts back in along with a tablespoon of butter and salt and pepper. I kept them frying until all of the butter had melted.

I'm not sure how healthy these greens were after I had finished with them, but they were delicious! I actually had them for lunch, but they make a great side dish for non-picky eaters.

Saturday, February 13, 2010

Band Tee Quilt

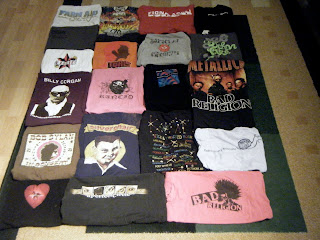
This will definitely be a longer term project. A friend came to me a bunch of old concert t-shirts. Not necessarily wanting to wear them, but definitely not wanting to get rid of them, she asked me if I'd make her a quilt or blanket from them. I knew I would be able to do it, so I said sure. Here is here contribution:


I think the roughest part will be getting everything cut to the right size. Not all of the shirts are the same shape or size, so that appears to be the biggest obstacle so far.


Fortunately, I went down to the basement bookshelves and found my "Generation T" book. Inside of it, there's a pattern for a similar project. Their's is for more shirts, but I am confident that I can construct my version using their methods.


(Pictures above from "Generation T: 108 Ways to Transform a T-shirt")


Like, I said before, this project may take a bit longer than my others. However, I'll definitely post the finished result when it's all done. Wish me luck ;)


Friday, February 12, 2010

I Blew Kisses, and I Merged.

Last night, two of my very good friends both hosted creative events in the city of Chicago. Despite the heavy traffic and bitter cold, lots of people came out to show their love, =ing fun and memorable times.


First up was Blowing Kisses hosted by the Rubbish crew (www.rubbishisgold.com) at EP Theater. I had never been there before, but it was full of vintage city charm. There was this amazing wallpaper - all illustrations of early 20th century women's faces. It was definitely a gem of a place. The guys did a great job of displaying various artwork for sale and setting up love letter stations. They even gave me a nifty cart to display my paper goodies on too:


(This is one half of the displayed items. Photo courtesy of Kyle LaMere from www.ishootrockstars.com)


Towards the middle of the night, my friends and I switched gears to show our friend, Mig (http://www.migreyes.com/), some love at Evil Olive. He hosted an awesome party for designers and creatives of all kinds. 


http://letsmerge.us/


(Photo courtesy of kisokiso on Flickr.com and illy by Jana Kinsman)

All in all it was a wonderful night with good friends and a lot of new faces. Even my car getting stuck in a giant snowdrift couldn't put a damper on all of the evening's fun!

Tuesday, February 9, 2010

Mango Guacamole

So I had been craving mango guacamole for a while. I'm not a huge fan of avocados either, but with mangos I love them. Anyhow, last week I bought all the ingredients to make the mango guac from scratch:

2 hass avocados
1 mango
1 medium red onion
2 serrano chiles
fresh garlic
2 limes

I had never made it before, but I figured it couldn't be that hard. I chopped up all of my ingredients and went for it.


Once I had all of the avocado chopped and in the bowl, I added the zest of both limes as well as the juice (so the avocados wouldn't oxidize). Then I added in the finely diced red onion and the garlic and gave it a stir. I saved the mango and the serranos for last. I gave everything a real good stir and that was it. I know some people like to blend or process their guac, but I really like the texture of a chopped one myself. The juice from the mango helped to soften the mixture too.


The final product was great. It tasted so fresh and had amazing flavor. It was perfect for our night in of playing games. It can definitely be doubled too in order to feed more people. 

I know lately my posts have been food food food. I'd be lying if I said I wasn't as passionate about it as I am with paper and fabric. It has just been really busy times. I have a show on Thursday where I will hopefully sell some items to raise money for Haiti relief. I like sharing recipes anyway though, and they still are handmade creations. Starting next week, I want to add make some more things to add to my etsy store. (Fingers crossed I can stay awake and concentrate to do just that!)

Monday, February 8, 2010

Easy Caramel Apple Turnovers

Hello! We had such a great, busy weekend. Yesterday was of course full of tons of food and friends with the Superbowl goings on. Saturday night was a lot of fun too. We went to Phil's parent's house for a dinner and game night. His mom made this great Mexican lasagna, and she asked me to bring the dessert. Oddly enough, I wasn't really in the mood for chocolate that night, so I made my homemade caramel apple turnovers instead. They are so easy to make, and the recipe can be altered in several different ways.

The ingredients I use are:

crescent roll dough (in a tube)
caramel dip (found in produce section)
Granny Smith apples
butter
cinnamon
brown sugar

First, I start by opening the package of the rolls. I unwrap all of them from each other and then spread out all of the triangles onto a lined baking sheet. Next, I take about a tablespoon of the caramel and smear it onto each triangle making sure to coat all the way to the ends. Then I take the apples (that I have chopped up) and put them into the microwave in a bowl with about a tablespoon of butter. I heat them for 30 seconds stir and then heat another 30 seconds. By then end of the minute, the apples are all nicely coated with the butter. I make a little pile of apples in the center of each triangle.

(Do not discard the leftover butter!)

Before they go into the oven, sprinkle a little bit of cinnamon onto each apple pile. Then fold each of the ends up and form a little knot (trying to keep all of the apples inside the dough). Finally, take the leftover melted butter and apply to the tops of each turnover. (This will help to make them golden brown also help the sugar to stick). Put a little pinch of brown sugar on the top of each one as well. To bake,  just follow the time/temperature instructions on the tube from the rolls.


This is what they look like when they come out (after about 11-13 minutes):


After they cooled off, I put them in a container to take to game night. 


Even though they weren't chocolate, they were still a big hit! I just put them in a warm oven for a few minutes prior to serving so they were nice a gooey. (That's the best way to eat them).

The best part about this recipe is that the possibilities are endless. It all goes according to the baking instructions of the crescent rolls. Any type of fruit or vegetable would work in this case. (I would just recommend microwaving them first -steaming the veggies in a little water- to make sure that they don't have too much of a bite). Instead of caramel, try cream cheese or cheddar cheese. :)

Thanks for reading and enjoy!

Friday, February 5, 2010

Pork Stoup

Last night I tried out another 'Ask Aida' recipe, her pork stew. I think mine may have been less thick, but the result was still incredible! I also substituted out some not so favorite things for a flavor profile that I liked (parsley for oregano and red bell pepper instead of green).

Rather than talk all the way through it, here is the recipe and some of the steps in photos:

http://www.foodnetwork.com/recipes/aida-mollenkamp/pork-and-green-pepper-stew-recipe/index.html


kind of a slimy task, but it was super fresh!


It took a while to get through this, because one shoulder still had a bone and my knife wasn't the best.


everything just hangin' out together and getting browned


The stock and beer had just been added at this point...and smelled amazing.


Finally, an hour and a half later, time to eat! (well worth the wait)


I think the major difference, compared to other homemade meals, was the fresh herbs. They are so much better than jarred and flaked. I found them for surprisingly cheap too. Please feel free to share any of your favorite recipes!

Wednesday, February 3, 2010

A Few New Creations

I have been trying to make some new items this week to bring to Blowing Kisses. Today I was able to come up with a few one-of-a-kind cards. I also decided to take a template I made a while back and create some cute, little framed silhouettes.

This first card below contains a found slide. The envelope is embellished with an original Polaroid strip on the back of the flap. (The inside is left blank for personalization).


Here is an example of one of the framed silhouettes:


I traced the bear onto a piece of 'leathery' paper. Then I mounted it on scrap piece of decorative paper. It is simple and graphic, and I think these will make a fun statement in any room.

Please be sure to read more about the Blowing Kisses event:

http://kissyourcity.com/


Leftovers

So, I still had some spare ingredients from last night's dinner. Today I decided to have them for lunch. Instead of cubing the chicken again, I cooked the breast whole in olive oil. Once it was nice and golden, I squeezed in my lemon and added the rest of the artichoke hearts. I finished it off with a nice, fat pat of butter for flavor. Result:


It was still super tasty, and nothing went to waste!

Tuesday, February 2, 2010

Lemon Artichoke Chicken Dinner

Since I was laid up again today I didn't make anything new or crafty. I did, however, make dinner for us tonight. After watching Aida Mollenkamp's show on Food Network I wanted to try out one of her recipes. It is chicken with lemon and artichoke hearts. I make a similar dish typically with linguini or fettucine as the base. This dish is hearty enough without the pasta though. The chicken is the star. Here is her recipe:

http://www.foodnetwork.com/recipes/aida-mollenkamp/lemon-chicken-with-artichoke-hearts-recipe/index.html


This is the www.foodnetwork.com recipe photo.


It turned out really well even though I had a couple of failures with memory. I made it based off of her show and didn't recheck the recipe. I accidentally forgot the white wine and water mixture. The flavor was still great though. The chicken got nice and golden brown. The lemon, garlic and onion provided great aromatics, and the basil was really delicious mixed in with it. We'll definitely have it again.

Thanks, Aida!

Oy

Yet another sick day...Alas, I have been concocting new projects in my head for later this week. Hopefully they translate well!

Monday, February 1, 2010

The Weather Is Above Me

I am taking a sick day. I will keep you posted...